Admin Blog

76 articles
thumbnail (i.e. miniature image)

Duplication of items during user registration

Duplicate Fields During User Registration When registering a user, if any information overlaps with data already in use by another owner or administrator, the message ”This [field] is already in use‘ will appear. Fields that may be duplicated include ”Login ID,‘ "Display Name," and "Email Address." We will explain the conditions under which duplication occurs and how to handle it. Table of Contents 1. Reasons for User Registration Duplication 2. Duplication Conditions and Solutions Reasons for User Registration Duplication If you are using a shared server, field duplication may occur. This is due to the nature of shared servers. How Shared Servers Work A shared server is a type of rental server where a single physical server is shared among multiple owners and administrators. Imagine renting a room in an apartment building. It is a service similar to a "shared house," where multiple users share a single server. Therefore, there is a possibility of duplicate entries when registering users. Conditions for Duplication and Solutions Login ID A login ID must be unique. You cannot register a login ID that is already in use by another owner or administrator. You can use the characters and symbols listed below; mixing numbers and special characters will help prevent duplication. [Permitted Characters and Symbols] Half-width alphanumeric characters (a–z, 0–9), special characters (! ” # $ % & ‘ ( ) * + , – . / : ; = ? [ \ ] ^ _ `) Note: If you subscribe to the paid “Customization” option, you can use login IDs that overlap with those in other owner-administrator environments when registering users. *Only user login IDs can be duplicated. Owner/administrator login IDs cannot be duplicated. To use this feature, please follow the steps below. ① Select “Site Customizer” from the side menu. ② Click “Basic Settings.” ③ Open the "Login Form Settings" tab, turn off the "Allow login from URLs other than the user's main URL" toggle, and save. ④ Open the "Basic Information" tab, turn on the "Allow duplicate login IDs with general users under other subdomain owners" toggle, and save.   Display Name: As with the login ID, you can use the characters and symbols listed below. Mixing numbers and special characters will help prevent duplication. [Permitted Characters and Symbols] Half-width alphanumeric characters (a–z, 0–9), special characters (! ” # $ % & ‘ ( ) * + , – . / : ; = ? [ \ ] ^ _ `) *If you are using Ver. 2.20 or later, the ID may duplicate one already registered in another owner-administrator’s environment.   E-mail Address To resolve duplicate addresses, you can create an alias for your e-mail address using the “+” symbol. For Gmail, enter “+〇〇” before the “@”; for non-Gmail accounts, enter “++〇〇” before the “@”. Please note that all emails will be received at the original email address before adding “+〇〇”. Example) 〇〇〇〇〇〇@learningbox.co.jp… Original email address 〇〇〇〇〇〇++user1@learningbox.co.jp… ① 〇〇〇〇〇〇++user2@learningbox.co.jp...② All emails received at addresses ① and ② will be delivered to the original address "〇〇〇〇〇〇@learningbox.co.jp".   *If you are using Ver. 2.20 or later, duplication is possible under the following conditions: In other owner-administrator environments: ・ Email addresses registered as user accounts ... Duplication allowed ・ Email addresses registered as owner accounts ... Duplication not allowed  
E-learning - Market Size

The size of the eLearning market is growing in demand

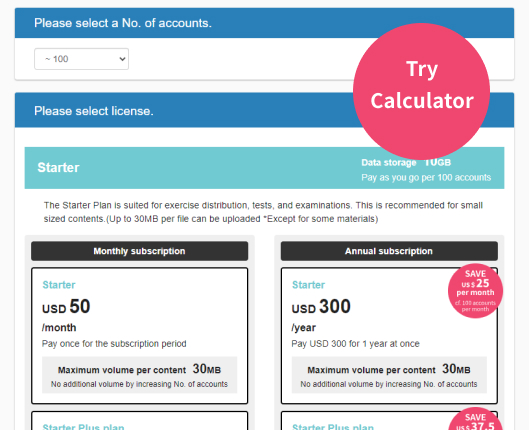
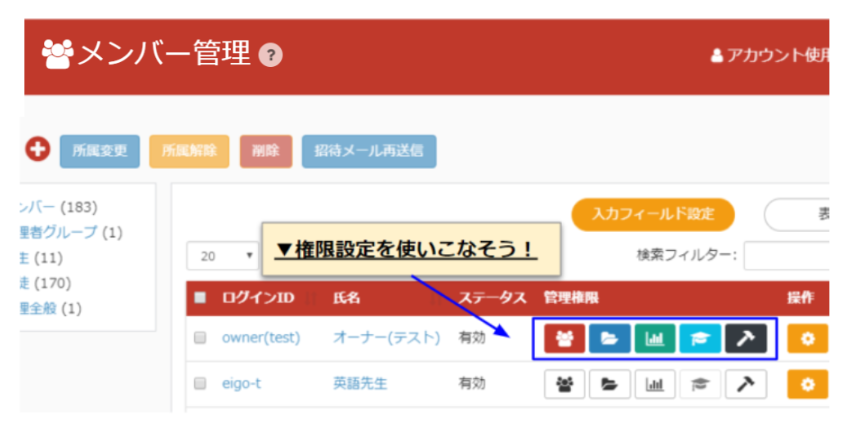
Market Size of the Growing E-Learning Market I’m Takadaoka from the Marketing Department. To prevent the spread of COVID-19, online learning using e-learning systems has garnered significant attention. In addition to measures to prevent the spread of the coronavirus, this trend is also driven by the fact that traditional employee training methods—such as in-person training and on-the-job training (OJT)—are becoming less effective. The research firm Yano Research Institute (Nakano, Tokyo) has released a report forecasting that the domestic e-learning market size for fiscal year 2020 will reach 246 billion yen, a 4.5% increase from the previous fiscal year. According to the report, demand for online learning is expected to continue even after the spread of the novel coronavirus subsides. The analysis suggests that learning services utilizing the internet—such as remote and online classes—will become increasingly prevalent at institutions like cram schools where in-person instruction is not possible. In this article, we will introduce the background and reasons why e-learning is essential in the coming era. Table of Contents: 1. Trends in the E-Learning Market Size for Fiscal Year 2019 2. Key Reasons E-Learning Is Gaining Attention for Employee Training 3. Examples of How E-Learning Is Being Utilized! 4. Efficient Talent Development Using learningBOX 5. Summary Trends in the E-Learning Market Size for Fiscal Year 2019 Source: Yano Research Institute | Based on survey results regarding the domestic e-learning market The B2B market is booming due to increased corporate investment in talent development. The domestic e-learning market size for the 2019 fiscal year is projected to reach 235.4 billion yen, a 7.7% increase from the previous fiscal year. The breakdown shows that the B2B market (including individuals within companies and organizations) is projected to reach 68.4 billion yen (up 5.2% year-over-year), while the B2C market (for individuals) is projected to reach 167.0 billion yen (up 8.8% year-over-year); both markets are expected to continue expanding. Source: Yano Research Institute | Survey Results on the Domestic e-Learning Market According to the article, this indicates that the e-learning market is growing in both the B2B and B2C sectors. In the B2B market, e-learning has become more user-friendly due to the diversification of learning tools driven by the widespread adoption of smartphones and tablets, the evolution of video content, and advancements in cloud environments. Combined with growing corporate demand for employee development, e-learning is now penetrating more industries and companies than ever before. What is B2B? B2B (Business to Business) refers to transactions between businesses, specifically where one company provides goods or services to another.   Sales Are Also Growing Steadily in the B2C Market The domestic e-learning market size for fiscal year 2020 is projected to reach 246 billion yen, a 4.5% increase from the previous fiscal year. This fiscal year, demand for distance learning is expected to rise in both the B2B and B2C sectors due to the impact of the COVID-19 pandemic, leading to an increase in the number of e-learning users. Source: Yano Research Institute | Based on survey results regarding the domestic e-learning market. In the B2C market, the spread of learning styles utilizing smartphones, tablets, and social media, the evolution of services driven by advances in information and communication technology, and the emergence of learning services utilizing AI (artificial intelligence). This is not only steadily increasing the number of users but also fostering an environment in which e-learning is becoming mainstream as a form of personal learning. Both the B2B and B2C markets are expected to continue expanding in the future. What is B2C? B2C (Business to Consumer) refers to transactions in which a company provides goods or services to individuals. For example, companies that sell products to general consumers—such as home appliance manufacturers, apparel retailers, and department stores—are B2C businesses. Reference: The domestic e-learning market continued to expand in fiscal year 2019, driven by a steady increase in the number of users and the diversification of services offered | Yano Research Institute Ltd. Why e-learning is gaining attention for employee training Many companies are likely considering implementing employee learning and training through e-learning. Amid this trend, some may be considering implementation while feeling uncertain about whether their company’s environment is suitable for e-learning or if it will be effective. Why are companies turning their attention to e-learning? Let’s outline the reasons.   Reason 1: Repetitive learning is possible anytime, anywhere, tailored to employees’ spare moments. With the diversification of work styles today, there is likely a growing demand for a training style that can be conducted at the employee’s convenience—regardless of time or place—rather than the traditional one-size-fits-all approach to employee training. With paper-based materials, even if you want to update the information to the latest version, you must create, print, and distribute new copies each time, which takes a long time for the updates to reach everyone. With e-learning, you can ensure everyone has access to the latest course simply by replacing the distributed materials.   Point 2: Minimizing the Time and Money Spent on Employee Development Companies that have traditionally relied on in-person training face significant costs for each session, including venue fees, travel expenses, and lodging costs. Furthermore, in-person training is often a one-time event, so if participants have questions later, they are left relying solely on meeting minutes. As a result, more and more companies are adopting e-learning because it allows them to deliver the same training to remote employees via the internet, thereby reducing costs. To summarize the issues with traditional training: It involves significant human and time costs... Costs arise from securing instructors, participants having to take time away from their regular duties, and scheduling adjustments. Furthermore, venue size may limit the number of participants, and adding instructors to accommodate larger groups can increase costs accordingly. It takes time to organize training... For training sessions involving large groups, a certain amount of time is required for preparation—from selecting a venue and coordinating schedules to planning the training content—to ensure the session is meaningful.   ▼Benefits of e-Learning • Easy management of learner progress • Lower operating costs • Reduced preparation effort • Standardized training quality Here are some scenarios where e-learning can be utilized! E-learning is a method of learning that utilizes the internet. Learning content, such as videos, is stored on a server (learning management system) and delivered to learners via internet-connected computers, tablets, smartphones, and other mobile devices. As a result, as long as learners have access to an environment where they can take e-learning courses, each individual can study at their own convenience, anytime and anywhere. While e-learning offers many benefits, it can be difficult to determine whether it can be used effectively or if it’s a good fit for your company. So, how is e-learning actually being used in businesses? Here are some examples of its applications. Used for Corporate New Employee Training An increasing number of companies are introducing e-learning to train new hires. After all, training new hires involves significant time and cost, from creating and preparing educational materials to assigning instructors during the training period. By utilizing e-learning, companies can reduce time and cost, measure trainees’ learning progress and outcomes, and use this data as a basis for decisions regarding their subsequent job assignments.   Used as an Internal Information-Sharing Tool Some companies also implement e-learning to share documents and surveys. E-learning is an extremely convenient tool for simultaneously distributing and collecting tests and surveys among employees. A major feature of e-learning is its ability to provide personalized training by tailoring its use to the needs of specific organizations, departments, or individuals.   Efficient Talent Development with learningBOX learningBOX is an e-learning system that makes it easy for anyone to get started with e-learning. It is designed with a focus on “ease of use” and “affordability.” It offers detailed customization options tailored to users’ needs, including course setup, learner group management, and the ability to distribute learning materials to specific groups. learningBOX is available starting at 33,000 yen per year for 100 accounts. You can use it for free with no time limit for up to 10 accounts, so please register for learningBOX and try it out to see how user-friendly it is and what it can do! ▼To see actual results and effects of learningBOX—such as how it resolved XX or improved XX—please check out our case studies here. ➡ Click here for learningBOX case studies Summary In this article, we introduced the market size of e-learning—a sector likely to see ever-increasing demand—and the underlying reasons behind this trend. We believe many companies are considering using e-learning for employee training and development. However, some may be hesitant to implement it, wondering whether their company’s environment is suitable for e-learning or if it will be effective. learningBOX is free for up to 10 accounts. You can easily create an account in less than five minutes. If you’re thinking, “I want to try e-learning, I’m interested in it, or I’m considering implementing it,” please give learningBOX a free try! Thank you for reading this article.

Building a development environment with Proxmox

This is Nishimura from the development team. We have been using an instance of aws (Amazon Web Services) for the development of learningBOX, but we are about to switch to development on our in-house server because of some inconveniences. Table of contents is here 1. inconvenient truth about aws 2. considered commercial PCs... 3. assembled 4. installed ProxmoxVE 5. steps to speed up drives on Proxmox 6. moving instances from existing proxmox environment 7. so, is it faster now? Inconvenient truth about aws Even though aws is convenient for operation, it is not so fast as a development environment... Actually, it is not so fast. If you use C5 series or Z1d, you can accelerate up to 4GHz, but honestly speaking, it is expensive. If you want to use multiple cores, the cost will be several times higher. In fact, it may not be very fast, but using an instance with a large memory and fast CPU will cost you several tens of thousands of yen per month. There is no instance that is just right. If the memory required for development is 2.1 GB, you need an instance with 4 GB of memory. Isn't this wasteful? You may be able to avoid some of this by using virtual memory, but the moment it can no longer fit in the real memory, the processing capacity will drop by an order of magnitude. I want to use just the right size instance. I considered using a commercial PC, but... I thought about buying a commercial PC and virtualizing it, but I couldn't find one that was just right. I don't need Windows. I don't need it. I can't remove it, or even if I do, it's not nearly as cheap. I don't need a GPU. Most PCs with fast CPUs have a high-performance GPU. You don't need one. (It may be necessary if desktop virtualization is installed, but I haven't tested it yet. I tried to assemble it. If I don't have just the right one, I can assemble it! So I assembled a PC for the first time in a year. The parts I used are as follows. All parts are shown except the case. For some reason, the case of a ping-pong racket is in the picture, but it has nothing to do with the case. Explanation of main parts Motherboard I am not particular about it CPU Core i9 10900 I chose it for its single threaded performance. I considered 10900K, but I thought 0.1GHz was not worth the 20,000 yen difference in price, so I decided to go with 10900. I installed 32GB of DRAM, which is a moderately fast DRAM. I will add more if it becomes insufficient. SSD I installed 1TB of a reasonably fast SSD (3GB/s). Power supply I chose a good power supply, as I was told by God to buy a good one. GPU For now, it is not installed. ProxmoxVE is installed. Using the whole PC may be the fastest way, but it is not the best way to use the equipment effectively, so I built a virtual environment with ProxmoxVE. I am running Amazon Linux 2 on the virtual environment, but I will introduce the procedure for running Amazon Linux 2 in another article. I thought the installation would be a piece of cake, but I wasted a lot of time because of a bad block on the USB memory stick I created for the installation. It would be better to make a habit of checking for bad blocks when making installation media. Procedure to speed up the drive on Proxmox This is the one that good kids should not imitate, but you can improve disk IO on a virtual environment by enabling disk cache as much as possible. It will probably be faster than reading/writing directly without the virtual environment. However, if the power goes out before the write completes, it will break, so good kids should not imitate it. Moving an instance from an existing proxmox environment I got into a lot of trouble, but I won't go into it here because it would take too long to explain. If you read the error messages carefully, you will be able to handle most of the problems. If you don't understand what is wrong even after reading the error messages, you can usually figure it out by reading the source code. Do your best. Migration is not possible if the VM is linked to other VMs. You can't migrate if you are using a physical drive or mounting a device for CloudInit. Remove the device. If you haven't already created a Cluster in your company, create one in your existing Proxmox environment and add a new virtual environment to it. Frankly speaking, I am not good at infrastructure, so we are looking for engineers who can manage this area! (Working at our headquarters in Tatsuno, Hyogo) So, are you fast? We compared the time taken to test our learningBOX (automated backend testing with PHPUnit). Comparison result aws environment (t2.small): 2.63 minutes old Proxmox environment (Core i5 9600K): 1.22 minutes new Proxmox environment (Core i9 10900): 1.1 minutes The difference between the two environments below is not big, but the difference with aws environment is obvious. The difference with the Proxmox environment is still significant, although it improves a little more with c5 or something like that. When there is no load, it is stable at 2.8GHz, but when a load is applied, it instantly rises to around 5GHz. High-speed automated testing directly affects work efficiency Whether or not strict TDD is performed, automated testing is indispensable for development above a certain scale. When a test result shows an error or a new test is created, you cannot proceed to the next task until the automated testing process is completed. On a typical day, we run 20 or 30 tests per day, and if we can save a minute per test, we can save that much time to develop new features or improve code quality. Future Policy With the construction of the Proxmox environment, we now have two pieces of hardware to support the virtual environment, and we have also achieved migration between virtual environments. However, building an HA (High Availability) environment requires three servers, and we intend to build a third environment and realize a stable private cloud at the same time as the Zen3 generation of Ryzen is released.
E-Learning Learning - Google Slides

Utilize Google Slides as e-learning contents

How to Use Presentations Created in Google Slides as E-Learning Materials My name is Takadaoka, and I work in marketing. In this article, I’ll explain how to register Google Slides—a handy tool for creating training and presentation materials—with learningBOX. Google Slides is one of the business tools provided by Google; it’s a convenient service that lets you create slides for free. By using our e-learning system, you can register materials created in Google Slides as individual learning modules. ➡ Slides can be accessed as e-learning materials by individual members or groups. Table of Contents: 1. What Is Google Slides? 2. Utilizing Slides in E-Learning 3. How to Embed Google Slides into learningBOX 4. Course Learning Using Slides and Quiz Features 5. Summary What Is Google Slides? Google Slides offers a wide variety of presentation “templates, formats, and fonts,” and makes it easy to embed videos and add animations. As an online presentation app that allows for collaborative editing with other users, it is a very convenient tool for communicating your thoughts and ideas more clearly. Differences Between Google Slides and PowerPoint Many people use Microsoft PowerPoint to create slide presentations. Here, we’ll briefly introduce the differences between Google Slides and PowerPoint. The interface of Google Slides is very similar to that of PowerPoint, with the necessary functions displayed around the central slide. The main difference is that Google Slides offers a more limited set of features, focusing only on those essential for creating slides. While PowerPoint is packed with features, this can mean there are many functions you don’t use, and you might sometimes have trouble finding the one you need. Google Slides is designed with a simplified set of features, allowing you to focus on creating your presentation. Additionally, thanks to its extensive selection of templates and integration with other applications, you can work quickly and efficiently. Google Slides’ strength lies in its simplicity and sleek design, while PowerPoint’s strength is its wealth of features. To summarize the features of Google Slides: Smooth real-time collaborative editing for multiple users; a wide variety of free themes available; integration with other Google applications; the ability to search for and insert free images directly from the web; and automatic data saving. While you need to install PowerPoint to create slides, Google Slides can be used directly in your browser without any installation. How to Get Started with Google Slides To use Google Slides, you need to have a Google Account. If you don’t have an account yet, please create one first. Once you’ve created an account, open Google Slides. *You can set up a Google Account here. ➡ Create a Google Account Using Slides for e-Learning At Tatsuno Information Systems, we use Google Slides to create materials for new employee training and in-house training. The materials we create can be uploaded directly to learningBOX, making them immediately available for e-learning—which is a major advantage. The registration process is designed to require just a few mouse clicks, so anyone can easily complete it. Click here for examples of how Tatsuno Information Systems uses this feature. When proceeding with e-learning using learningBOX, learners click [Start Learning] in the sidebar to begin the training. Content (learning materials) in learningBOX is managed by individual folders. Learners select materials from within a folder to proceed with the training. ▼ Here is a screenshot of the actual learner interface. Create company overview materials in Google Slides ⇒ Use them in e-learning!! How to embed Google Slides into learningBOX To register Google Slides as learning materials, you need to configure the settings in Google Slides and then register them in learningBOX. Since this is a practice session, we’ll use a learningBOX user manual created in Google Slides as an example. How to configure settings in Google Slides ▼ Please watch this video. Step 1. Click “File” in the upper-left corner and select “Publish to the Web.” Step 2. Click “Embed” and configure the slide size and auto-play settings. Step 3. Once you’ve finished configuring the settings, click the “Publish” button. Step 4. The embed code will be displayed; copy it. *You’ll use the copied embed code later when registering it with learningBOX! How to Set Up learningBOX ▼ Please watch this video. Step 1. Log in to learningBOX. From the My Page screen, click “Content Management.” Step 2. Click the “+” button, then select “Other Materials” > “iframe Materials.” Step 3. Enter a title and paste the embed code you copied earlier. Step 4. Once you’ve pasted the embed code, click the “Save” button. That completes the registration of your Google Slides presentation. Let’s view the slides on the learner screen ▼Please watch this video. Click [Learn] in the sidebar. When you open the content you created, the Google Slides you just set up will be displayed. Once the learner has viewed all the slides, their status will change to [Completed] and their results will be saved. Click [View Scores], then click the Details button to review the course’s score data in detail. Course learning that combines slide materials with the quiz feature Among learningBOX’s content features is a quiz feature highly recommended for supporting learners’ memorization and learning. Using this quiz feature allows you to quantify learners’ understanding of the slide content through tests and automatically grade them as “Pass” or “Fail” based on their test scores. Administering tests is expected to encourage learners to approach their studies with a greater sense of urgency. Please refer to this article for more information on learningBOX’s quiz feature. It provides detailed instructions on how to create and configure quizzes. ➡ Creating Questions ➡ About the Test Mode Settings Summary In this article, we introduced how to register Google Slides—a useful tool for creating training and presentation materials—with learningBOX. Our e-learning system allows you to register materials created in Google Slides as individual learning modules. The concept behind learningBOX is to provide an e-learning system that’s easy to get started with—both in terms of cost and usability. You can use learningBOX for free for up to 10 users. For customers who want to try e-learning but are having trouble taking that first step—signing up for an account is simple and takes less than five minutes. Take this opportunity to try our e-learning system for free!
Information Security - E-Learning System

How to Use IP Restrictions to Enhance Online Learning Security

How to Enhance Online Learning Security Using IP Restrictions My name is Takadaoka, and I work in marketing. In this article, I’ll cover the basics of IP addresses and explain how to set up IP restrictions. E-learning, online classes, and in-house training are extremely convenient as cloud services that can be accessed from anywhere. However, the ability to access these services from anywhere also increases the risk of unauthorized access and the danger of personal information leaks. IP restrictions are one way to address this issue. When IP restrictions are set up, users cannot log in to their accounts unless they use a specified IP address. Our learningBOX is an e-learning system that allows you to set up comprehensive IP restrictions for robust security. Table of Contents: 1. What Is an IP Address? 2. Connection Restrictions Based on IP Addresses 3. Setting Up IP Restrictions in learningBOX 4. Summary What Is an IP Address? To put it simply, think of an IP address as a “number” assigned to computers and communication devices connected to the Internet. When using the Internet to browse websites or send and receive emails, it is necessary to identify the other party in the communication. This is the role that IP addresses play. Every device connected to a network is assigned an IP address. An IP address functions like an address on the Internet, assigned to identify devices on the network, such as computers, smartphones, and tablets. Basic Knowledge of IP Addresses Source: From the free encyclopedia “Wikipedia” IP addresses are expressed using decimal numbers. To make these numerical IP addresses easier for humans to understand, they are replaced with letters—this is what is called a “domain name.” A vast number of users are constantly moving about on the Internet. A global IP address indicates who and where a person is when they view or access a website. This global IP address is unique and does not overlap with any other address worldwide. This works on the same principle as phone numbers and addresses, which are also unique! What Is the Decimal System? The decimal system is a numeral system with a base of 10. It uses all digits from “0” to “9” to represent numbers. ➡ [0, 1, 2, 3, 4, 5, 6, 7, 8, 9] Connection Restrictions Based on IP Addresses: learningBOX allows you to restrict access so that it can only be viewed from specific IP addresses. However, please note that the “IP restriction” referred to here is a setting that targets global IP addresses. There are two types of IP addresses: global IP addresses and private IP addresses. Private IP addresses are not used for internet connections in the first place. Be sure to keep in mind that IP restrictions apply only to global IP addresses!! Setting Up IP Restrictions in learningBOX Starting with learningBOX Version 2.11, you can configure IP restrictions based on the source IP address. How to Set Up IP Restrictions ▼ Log in to learningBOX and navigate to Member Management > IP Restrictions in the side menu. When you click IP Restrictions, the screen will switch to “Login IP Restrictions.” Restricting IP Addresses This feature can be configured on a per-group basis. Click “Add IP Restriction” to open a pop-up configuration screen. Select a group, enter the IP address, and click the “Add” button to add it. Select a group member, enter the IP addresses they are allowed to log in from, and click the “Add” button. The IP restriction has been set up. Summary: In this article, we’ve provided a brief overview of the basics of IP addresses and how to set up IP restrictions. Setting up IP restrictions helps prevent unauthorized access and protect members’ personal information from data breaches. Since setting up IP restrictions in learningBOX is straightforward, please use this article as a guide and try implementing IP restrictions tailored to your specific needs.
Online Learning - Member Management

Let's use the privilege settings of learningBOX! School Use Part 2

Mastering learningBOX Permission Settings! [School Use Guide, Part 2] Hello! This is Shinokura ⛄ from the Quality Control Department. The rainy season has begun, and we’re experiencing a string of humid, rainy days—how is everyone doing? Please take care of yourselves during the rainy season, as the fluctuating weather and temperature changes can easily make you feel under the weather. In this article, following up on our previous post, I’ll introduce how to use permission settings with a focus on school use cases. In the previous article, I explained how to use permission settings to grant groups and members only the permissions they need, rather than assigning the same permissions to everyone. In this article, I’d like to explain how to configure detailed settings—such as learning management, grade management, and teaching material assignments—for the subjects and classes each teacher is in charge of. If you found the permission settings difficult to use, please be sure to check out this article. Article on permission settings: What Are learningBOX Permission Settings? Mastering learningBOX Permission Settings! [School Implementation Guide] Table of Contents 1. Let’s Set Permissions Using a Japanese Language Teacher as an Example 2. Use Group Management Permissions to Set Assigned Classes 3. Use Teaching Material Management Permissions to Specify Content 4. Use Grade Management Permissions to Ensure Only Homeroom Teachers Can View and Grade 5. Summary: Let’s Set Up Permissions Using a Japanese Language Teacher as an Example In this guide, we’ll configure settings to enable the following: ・As the homeroom teacher for Class 1-1, the teacher can view the grades of students in their homeroom class. ・As the teacher in charge of the Japanese language subject, the teacher can manage teaching materials and content for each grade level (1st–3rd) and view grades. ▼Basic Information: Mr. Tatsuo Tatsuno Subject: Japanese Class in Charge: 1st Grade, Class 1 ◆Step 1: Log in as a “Full Administrator (Vice Principal)” or “Owner Account (Principal)” under General Management. ◆Step 2: Click the Content Management screen and create a folder using the [Plus Button]. Set up folders for each level of the hierarchy so that when you open a student’s folder, it opens in the order of grade level followed by subject. ◆Step 3: Return to “Documents” in Content Management and configure material assignments. Assign the student folders to the “Students” group. Use group management permissions to set the classes you are in charge of. Once material assignments are complete, configure the groups. ◆Step 4: From the Member Management screen, configure group management permissions and set the classes taught by Mr. Tatsuo Tatsuno. After setting the classes he teaches and clicking the Save button, the icon will turn red. Use the course material management permissions to specify the content. ◆Step 5: From the Member Management screen, click “Course Material Management Permissions.” Use these permissions to set the Japanese language classes for the grades taught by Mr. Tatsuo Tatsuno. Save the settings as “1st Grade Japanese, 2nd Grade Japanese, 3rd Grade Japanese.” Use the Grade Management permissions to configure the system so that only the assigned teacher can view and grade the work. ◆Step 6: From the Member Management screen, click the “Grade Management Permissions” option. ▼Specify the group name and course material folder as shown below, then click the “Save” button. ◆Step 7: Configure course material assignments. Specify the classes you are in charge of and the associated folders, then click the “Save” button. This completes the setup of administrative permissions for Mr. Tatsuo Tatsuno. Please follow these same steps to grant permissions to the accounts of teachers for each subject and save the settings. Once the permission settings are complete, each teacher will be able to create content within their assigned subject (folder). Student answers will also be accessible only to the relevant subject teacher, who will be able to view and grade them in accordance with their permissions. Let’s log in as Mr. Tatsuo Tatsuno to verify what actions are available. ◆ Member Management: Members below “1st Grade, Class 1” are displayed, and you can create, edit, and delete members below this level. ◆ Content Management: You can create, edit, delete, and assign learning materials below “1st Grade, Japanese.” Similarly, you can create, edit, delete, and assign learning materials under “Students, 2nd Year” and “Students, 3rd Year – Japanese.” ◆ Member Grade Management ▼ Mr. Tatsuo Tatsuno can perform the following actions: view, grade, export to CSV, and send grade management notification emails. Grades for “1st-Year Students” for members belonging to the “1st-Year Students, Class 1” group (→ because he is the homeroom teacher for Class 1) Grades for “1st-Year Students, Japanese” for members belonging to the “1st-Year Students” group (→ because he is the Japanese teacher) Grades for “2nd-Year Students Japanese” for members in the “2nd-Year Students” group (→ because he teaches Japanese) Grades for “3rd-Year Students Japanese” for members in the “3rd-Year Students” group (→ because he teaches Japanese) Summary In this article, we discussed how to set permissions for teachers by subject, using a school setting as an example. Using this method, you can flexibly combine permissions—such as assigning a teacher to all grades at times, or to just one class at other times—without having to grant the same permissions across the board. Due to the impact of the coronavirus, online classes have become more common, and many schools are likely introducing or considering e-learning systems. learningBOX is a learning management system that even first-time users can operate and configure without difficulty, allowing them to learn its functions intuitively through hands-on use. Teachers working in schools often have many different roles. They likely manage various roles and organizational responsibilities, such as being in charge of a grade level or a specific class, as well as the subjects they teach. Please try configuring permissions by considering the specific permissions each teacher should have, without granting unnecessary access.
Questionnaire on learningBOX feature requests

Questionnaire on learningBOX feature requests

Thank you very much for your continued use of learningBOX. We have compiled the results of the survey we conducted in April with your cooperation, and we would like to share them with you. We sincerely appreciate the valuable feedback we received from so many of you during the survey. We will use the feedback and comments you provided to guide our future development strategy for learningBOX—including the features we should develop—as we strive to ensure your continued satisfaction. The information you provided will be used solely as reference material for our future quality improvement initiatives. Table of Contents 1. About the Survey 2. Survey Results Report 3. Summary About the Survey This survey consisted of five questions. Thank you very much for taking the time out of your busy schedule to participate in our survey. Survey Questions: Question 1: Do you use the paid version? Question 2: Please tell us how you use learningBOX. Question 3: Please rate your satisfaction with our company. Question 4: Please let us know if there are any products you considered alongside ours or any other products you have used in the past. Question 5: Is there anything you would like to achieve with learningBOX, or any features you would like to see added? Survey Results Report Question 1: Are you using the paid version? Question 2: Please tell us how you use learningBOX (multiple selections allowed). Question 3: Please rate your satisfaction with our company. Thank you very much for your high ratings. We are not satisfied with the results of this survey; we take the concerns and feedback you have shared very seriously and will strive to improve our features in the future. Question 4. Please let us know if there are any products you considered alongside ours or any products from other companies you have used in the past. ・We did not consider any other products. We prioritized price when making our decision. ・Since we hold monthly training sessions and manage the performance of about 100 people for internal reporting, “ease of creating learning materials” and “ease of managing performance and sending notifications” were major factors in choosing your e-learning platform. ・learningBOX gave me the impression of being visually approachable and easy to use. The cost was also reasonable, which made implementation easier. Even now, just as my initial impression suggested, I believe it is a user-friendly system that is easy for both administrators and learners to use. Question 5: Is there anything you would like to achieve with learningBOX, or any features you would like to see added? ▼ Regarding Quizzes: ・I would like to create fill-in-the-blank questions where the correct answers can be in any order. ・I would like to be able to mix questions where the order of the answer choices is randomized with those where it is not. ・I would like an auto-save feature. There have been many times when I’ve navigated to another page without saving my changes. • The responsiveness seems a bit slow when using smartphones or iPhones for sorting exercises. • It would be convenient to have an option where users pass or complete the course simply by answering all questions, without setting a specific passing score. ▼ Regarding Flashcards • It would be great if audio could be used with flashcards. ・Flashcards are useful for memorizing English vocabulary, but it would be even better if they had a read-aloud feature. ▼Regarding Email Notifications: I often want to send reminder emails to users who haven’t finished studying the material. In such cases, it would be very helpful if there were a filter that allowed me to send emails in bulk to users who haven’t studied the material yet or are currently studying it. Currently, this cannot be done without sending emails individually. ▼ Regarding the Survey Feature: We’ve received feedback that the layout makes the questions difficult to read because they’re aligned to the left. We’d appreciate it if you could make the layout editable or reconsider this design. Other: ・It would be great if we could use PowerPoint animations and other features without having to use iSpring. ・We’d like to conduct online classes aimed at preventing the spread of COVID-19. (Online classes) ・A feature to schedule uploads and receive notifications upon completion. (We’d like to select multiple pieces of content and upload them in sequence.) ・We’d like to add internal notes to the names of learning materials. (A feature that allows us to communicate with other administrators via comments visible only to administrators, such as “For XX.”) ・I’d like a bulk configuration feature for administrative functions. (When granting grade management permissions to multiple people, I’d like to set them up all at once.) ・It would be helpful if larger files could also be uploaded. ・I’d like to create, edit, and manage chapter-based video training courses in learningBOX. ・I’d like a chat feature. This would allow students to casually ask questions, explain concepts to each other within the same group, and share concerns. For customers who wish to conduct online classes: Regarding requests for online classes using videos, please be sure to read the article “Trying Online Classes on learningBOX Using Live Streaming Tools.” It explains how to set up live video streaming using learningBOX and the video-sharing site Vimeo. For customers who wish to upload large files: If you were unable to upload a video due to its large file size, please be sure to check out our article on how to compress videos to reduce file size. It provides detailed instructions on how to compress videos to reduce their file size. For customers interested in using chat: Using the learningBOX message box allows group members to easily exchange messages, just like in a chat. For information on how to use and set up the message box, please refer to the article titled “The Message Box Feature for Online Learning.” Summary: In this survey, we asked five questions. Thank you very much for taking the time out of your busy schedule to participate in our survey. We truly appreciate the valuable feedback we received from so many of you. We will use the opinions and feedback you provided to guide our future development strategy for learningBOX—including which features to prioritize—as we strive to ensure your continued satisfaction.
Online Classes - Free

I recommend it for online classes! An e-learning system that is easy to set up, even for first-time users

Hello, this is Kuroda from the Quality Control Department. Do you know all the different types of content you can create using our e-learning system? learningBOX is equipped with content, features, and a learning environment that make it easy even for beginners to start online classes. In this article, I’d like to discuss “How to Choose Content on learningBOX,” a topic we’ve been receiving many inquiries about recently. I’m still getting used to writing articles, but I’ll do my best, so I hope you’ll enjoy this post. Table of Contents: 1. Types of learningBOX Course Materials 2. How to Choose Learning Materials 3. Examples of How to Use Them 4. Summary: Types of learning materials available on learningBOX There are a total of 15 different types of features currently available on our e-learning system! Some of you may have been surprised by the sheer number of features and types offered by learningBOX. However, this abundance of learning materials is precisely what makes learningBOX so strong and is the secret to its popularity! By utilizing these 15 types, we can fully support a wide range of applications—including “online learning, new employee and in-house training, and remote training”—for all kinds of companies, schools, and tutoring centers! How to Choose Learning Materials With so many options, it can be overwhelming to design materials from scratch. Many of you may be wondering: “Can I create the exact materials I have in mind?” or “How should I combine the content I’ve created?” For customers facing these challenges, we’d like to briefly introduce learningBOX’s content features. If you’re unsure about how to create your materials, please use this information as a reference. Quizzes and Tests: Using the quiz feature, you can create and grade exam questions—such as school tests, mock exams, and pop quizzes—that were previously conducted on paper, right on the web. With a wide variety of question formats available—including “single-choice, multiple-choice, essay, and fill-in-the-blank”—you can create questions in any of over 12 different formats. The quiz feature allows you to create questions in two modes: “Master Mode,” which is ideal for previewing or reviewing material, and “Normal Mode,” which is suitable for actual exams. We highly recommend this quiz feature if you want to promote learners’ understanding and help them retain information. There is also a setting to hide scores from learners. ➡ Click here to learn how to use the Test Mode settings Flashcards Many of you have probably seen these before or used them to memorize information. I, too, relied on them frequently for exam preparation, from high school through my early career. These flashcards work just like traditional physical flashcards—you cannot review them randomly. However, by checking the “☑ Memorized” box, you can visualize your progress in terms of what percentage you’ve memorized. Why not try using them for content you want learners to memorize thoroughly, or as a supplement to test preparation? Unlike traditional flashcards, these allow you to preview and review material as many times as you like using just your smartphone. Videos and YouTube Videos: In learningBOX, in addition to uploading videos you’ve created, you can easily set up YouTube videos as well. Simply copy the embed code and paste it into the designated field. By using videos and YouTube videos as teaching materials, “you can track who watched them, when, and for how long on the performance screen.” One advantage of videos is that they can be watched repeatedly, making them extremely useful for content that’s difficult to memorize in a single session—such as university lectures or lab experiments. *Please be mindful of video copyrights when using this feature. Web Pages: This feature lets you easily create explanatory pages. Since you can add pages, you can use it just like a textbook. You can do more than just write simple text like in a notepad—you can also change the font size and text color. Fill-in-the-Blank Notes: Fill-in-the-Blank Notes let you easily create memorization exercises in text format. You can use it to memorize words that frequently appear on exams by highlighting the words you want to memorize and covering them with a red sheet. I have fond memories of my high school world history textbook—I used to highlight passages with a green marker and cover them with a red sheet to memorize them. Like flashcards, the key feature here is that as you cover more and more text, you can visualize your progress in terms of what percentage you’ve memorized. Please use this for memorization materials before exams. Surveys: Collect responses from multiple people to a specific question. Administrators can download aggregated response data as a CSV file from the “By Question” tab on the grade management screen. Reports: Supports both text input and file submissions, and administrators can grade them by adding comments. Learners can easily view their grades on the Grade Details screen or under “List of Submitted Reports” in the side menu. PDF: You can allow learners to view and distribute PDFs. Settings to prohibit printing and downloading are available. Attachments: Use this feature when you want to share data or files with users. You can attach a single data file or compress multiple files into a ZIP file to create an attachment-based learning resource. Using this feature, you can allow learners to download a variety of files as learning materials. SCORM Courseware: You can upload courseware previously used on other LMS platforms or your own custom content. Two of our engineers have created SCORM courseware in the past and are sharing their experiences. ▼Click here for articles on SCORM course materials: • How to Create and Add SCORM Course Materials Using TensorFlow.js • Convert Your Own Programs into SCORM Course Materials for Use in learningBOX Typing Course Materials These are course materials for typing practice. You can configure the font size, time limit, passing score, question order, and grading level; on the detailed results screen, incorrect characters are displayed in bold red text. iSpring Course Materials iSpring is available as a PowerPoint add-on. By utilizing iSpring, you can record lecture videos based on existing PowerPoint materials you already have on hand. This is a recommended authoring tool for those considering producing video presentations in-house. iframe Course Materials You can register these as course materials by specifying an “embed tag” using HTML syntax. If the embedded content is a quiz from our QuizGenerator, scores will not be saved; however, the history of opening the learning material can be viewed on the grade management screen. In addition to our quizzes, you can also embed flashcards and Google Maps. Certificates You can create certificates—ranging from stylish to cute designs—that make learners feel special. You can set an issuance date and expiration date, and you can print, save as a PDF, or save as an image. You can easily view certificates you’ve earned on the certificate list screen. Here are some examples of how to use this feature. For this project, I created a flashcard-style study guide to help learners memorize prefectural capitals! The text is centered and fairly large, and I’ve also added furigana. Even adults can learn effectively with this. Use flashcards as a self-study aid Combine content to create a structured course Use the quiz feature to test what learners have studied with the flashcards, and award a certificate once they pass the required score! Let’s watch a video showing the entire process. ▼If the video is hard to see, please switch to full-screen mode. Summary In this article, I’ve introduced “How to Choose learningBOX Content,” a topic we’ve been receiving many inquiries about recently. By selecting the right learning materials, you can achieve more effective learning. For detailed instructions on how to use learningBOX, please refer to the “learningBOX Content Management” section, which contains more in-depth information. Also, if we come up with any good ideas or hear about customer use cases, we’ll be sure to share them with you as they come up, so we look forward to your continued support!
Live Streaming Video - Online Learning

Online classes on learningBOX using live-streaming tools

In this article, we will introduce how to conduct online classes using learningBOX and the video sharing website Vimeo. Table of Contents 1. what is Vimeo 2. how to register and set up Vimeo 3. how to set up live streaming on learningBOX 4. summary What is Vimeo Vimeo is a website where you can share and watch videos similar to YouTube and Nico Nico Douga. Unlike YouTube, Vimeo does not display advertisements. ⇒ Vimeo is a video-sharing website born in the U.S., similar to a video-sharing website like YouTube, but unlike YouTube, Vimeo does not display advertisements. You can also set up a password to limit video viewing to only those who can use a specific domain or know the password! How to register and set up Vimeo If you want to set up online classes using Vimeo, you can sign up for the Premium plan here. The Premium plan is a prerequisite for setting up live video. The Plus, Pro, and Business plans do not support live video streaming. Please note this when signing up for a paid plan. *Vimeo's paid plans come with a 30-day money-back guarantee to get started. If it does not fit your usability, they can offer a refund for up to 30 days of use. (At the time of writing: information as of June 1, 2020. Please check Vimeo's website for more details). How to set up Vimeo When you sign up for a Premium plan and log in to Vimeo, you will see a screen like this. To set up a live stream, click "Live Event" on the side menu bar. Click on the "Create Live Event" button on the side menu bar. STEP: 2 Set up the video streaming settings. You can set up the video streaming date and publication restrictions here. After completing the settings, click "Next" at the end. STEP:3 Set up a specific domain from this screen ◆STEP:4 Embed privacy from [ Embed ] Please proceed to Specific Domain. STEP:5 After setting the domain, click the "+" button at the end. ✦STEP:6 Open the [Embedding] tab and copy the embed code for your video. How to set up live streaming on learningBOX Once the Vimeo settings have been set up to ◆STEP:3 ⇒ ④, the next step is to set up to stream on learningBOX. Please log in to learningBOX and go to Content Management ⊕ button ⊕ Other materials iframe materials. Enter a title and ◆STEP:3 ⇒ Enter the embed code copied in ④ into the embed code field of [iframe teaching materials] and finally click the Save button. After setting up the learningBOX, return to the Vimeo settings screen and click [Start Live Streaming]. You can find a detailed explanation of how to use Vimeo's live video streaming service here. Conclusion In this article, we introduced how to set up an online class using learningBOX and the video sharing site Vimeo. By using Vimeo, you can not only distinguish between public and private videos (password-protected or open only to those you wish), but you can also set detailed privacy settings for each video. The domain name of the video can also be specified, which is useful for making videos available only on the company's own website or on closed members' websites.
learningBOX is now version 2.11

learningBOX has been upgraded to version 2.11

About This Version Update Thank you very much for your continued use of the learningBOX e-learning authoring system. Today, learningBOX has been updated from Version 2.9 to Version 2.11. In this article, we will provide a detailed overview of Version 2.11 (released on May 19, 2020), which includes various new features.   List of New Features and Improvements ☑ “Certificates” ☑ “English Language Support” ☑ “B2B Sales via the E-Commerce Function” ☑ “Order Screen Redesign” Starting with Version 2.11, English language support for learningBOX—a feature frequently requested by customers with international employees—has been added. In addition, the certificate feature has been further enhanced. Numerous other features have also been added, including improvements to existing functions. Now, let’s take a closer look at the Version 2.11 update. Certificates: From stylish to cute designs, create certificates that make learners feel special. Starting with Version 2.11, you can customize the design and layout of certificates to suit your preferences. Previously, certificates were created according to a predetermined format, but now you can freely customize them. In addition, you can save certificates you’ve created as templates and edit them later. English Support You can now view and operate learningBOX in English while retaining all its original features! While retaining all the features of the Japanese version, the system can now be operated in English, making it accessible to an even wider audience. English Websites Now Available We have also launched English versions of the manual site and the service introduction site. ▼learningBOX ▼QuizGenerator B2B Sales via the e-Commerce Feature learningBOX’s e-commerce feature now supports B2B sales! Previously, the feature was specialized for B2C and used to build new online sales businesses, but now learning content can be purchased by companies or groups. Order Screen Redesign: Starting with Ver. 2.11, the order screen has been redesigned. We’ve made it easier to select plans and review option details. *Due to the redesign, there are currently some plans for which you cannot renew your subscription online. In such cases, the “Upgrade” and “Sign Up” buttons will not be displayed. We apologize for the inconvenience, but please contact us via the inquiry form or by phone to let us know you wish to renew.   Other Information: For detailed instructions or if you have any questions, please contact our CS Sales Team. ● Contact Form We will continue to listen to our customers’ feedback and work to improve our features to make your experience even more enjoyable. We appreciate your continued support of learningBOX and QuizGenerator.
Find more about learningBOX