Admin Blog

76 articles
certificate_learningbox

How to issue and set up certificates for children studying at home through online learning

I’m Fukumoto 🍞 from the Marketing Department. In this article, I’d like to introduce the "Certificate" feature included in the content functions of our learningBOX platform. Due to the impact of the coronavirus, I believe there are many educators who are struggling because school classes aren’t progressing as planned or have been interrupted. In addition to the quiz creation tool, video content, flashcards, fill-in-the-blank worksheets, and typing exercises—all essential for online learning—learningBOX’s content features also allow you to set up "Certificates," which are digital awards. Using this feature, you can issue certificates to members who meet certain passing criteria or have completed their studies. These certificates can also be printed. The process is extremely simple, so anyone can easily create and set them up. Please use this article as a guide and give certificates a try! Table of Contents: 1. What Are Certificates, Anyway? 2. Introducing a Course That Includes Certificates. 3. Passing a Quiz to Earn a Certificate 4. Summary What Exactly Is a Certificate? With learningBOX, you can issue digital certificates to members who have "passed or completed" the content (learning materials) you’ve created. ▼Do any of you have concerns or questions like these? ① I want to give an "Effort Award" to members who worked really hard on their studies… ② I want to send a “Certificate of Passing” to members who passed quizzes or exams… ③ I want to send a certificate to members who completed all the online lessons… I imagine many of you want to set up and send “XX Awards” or “XX Certificates” for various scenarios like these. You’d like to award special “XX Awards” or “XX Certificates” based on learners’ hard work, effort, test scores, and learning progress, right? As children progress through online learning, receiving “XX Awards” or “XX Certificates” based on their performance can help them maintain their goals and motivation. ▶ You can solve these challenges by using the learningBOX certificate feature!! Here’s an introduction to a course that incorporates certificates. Since this is a practice session, we’ll set it up so that members who complete a web quiz created in learningBOX and achieve a passing score will receive a certificate. Log in to learningBOX with your administrator account, and let’s get started creating a course that incorporates certificates. What We’ll Cover: ① Create a quiz. ② Use the constraint bar to set “--- You’ve passed this point and can proceed to the next section ---.” ③ Award certificates to members who pass the quiz. Let’s create a quiz! Quizzes created in learningBOX allow you to include images and videos, and you can also set links within the player—for example, to a page with explanations. You can also hide the “Correct/Incorrect” indicators for test questions and configure the system to randomly reorder questions and answer choices when presenting them. It’s also easy to set point values for questions and time limits. You can check the available options in learningBOX here. ▼ We’ll be using this quiz in this session. You can take the actual quiz here. Take the Quiz! learningBOX’s quiz creation feature allows you to create quizzes from over 12 different question formats. By utilizing the automated voice feature, you can easily create foreign language listening comprehension questions simply by entering text. It supports a wide range of languages, including English, Chinese, Portuguese, and German, and you can even choose between a male or female voice. Creating a Certificate Since this is just a practice session, create a folder, and within that folder, set up the following: Quiz ▷ Certificate ▷ Constraint Bar. If the video is hard to see, click the bottom-right corner of the video to view it in full screen. ▼ Please watch this video. Steps for Creating a Certificate Step 1: Log in to learningBOX with an administrator account. Step 2: Go to Content Management ‣ Certificates. Step 3: The certificate creation form will open. Please enter the information according to the specified format. We’ll use the English quiz and constraint bar introduced earlier to create a course. In learningBOX, in addition to creating quizzes using the in-app form, you can also import and register questions in bulk using text files or Excel files. If you’re creating a quiz for the first time, we recommend using the question creation form. Even if you’re not comfortable using a computer, you can easily create the quiz you want simply by typing on your keyboard and following the dedicated format. *In this example, we’ll import the “English Quiz” created in advance as a text file and register it in learningBOX. Import this quiz into learningBOX. →[download id="34356"] ▼Please watch this video. ▼Once you’ve finished setting up the quiz, certificate, and progress bar, let’s set a thumbnail image to make it look better. Here are the images to use as thumbnails. Certificate thumbnail image →[download id="34395"] Quiz thumbnail image →[download id="34398"] Folder thumbnail image →[download id="34401"] Passing the Quiz and Receiving a Certificate Since this is just a practice session, let’s log in with the “Student A” account and go through the process of actually receiving a certificate. ▼Please watch this video Summary In this article, we introduced the “Certificate” feature included in learningBOX’s content functionality. When it comes to online learning, I believe that allowing children to earn “XX Awards” or “XX Certificates” based on their progress can help them set goals and stay motivated. The process for creating them is extremely simple, so anyone can easily create and set them up.
E-learning - Newcomer Training

Introduce in-house training for new employees using e-learning

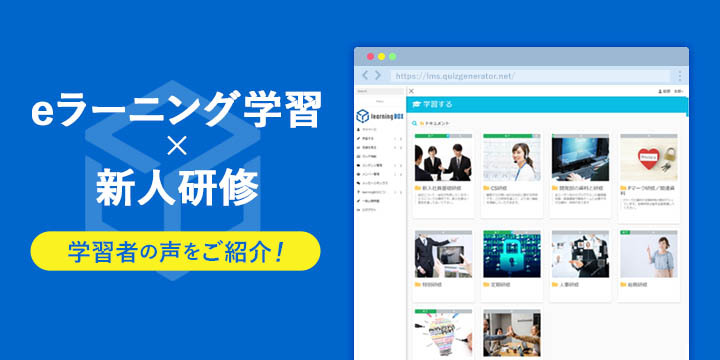
Nice to meet you! I’m Kozuki 🐰 from the Marketing Department, and I joined the company this year. As the new fiscal year begins, I imagine many companies hold orientation programs for new employees as soon as they join. I also went through new employee training! On learningBOX, of course! So, in this post, I’d like to introduce our new employee training program using learningBOX—our company’s e-learning system—and share my “first impressions” of using it. To those of you in charge who are considering “streamlining new employee training or implementing online learning,” I hope this article will help you as you evaluate the possibility of adopting learningBOX. ■ Table of Contents 1. Here’s Tatsuno Information Systems’ New Employee Training Program 2. The Training Process 3. My Thoughts on the Training 4. Summary Here’s Tatsuno Information Systems’ New Employee Training Program At our company, all new hires use learningBOX to complete the “Basic New Employee Training” and “CS (Customer Support) Training.” After completing these two courses, new hires proceed to department- and specialty-specific training. Here’s a brief overview of the training content… STEP 1: New Employee Basic Training Participants learn basic information about the company, including business operations, employment regulations, internal policies, work tools, and information security. STEP 2: CS (Customer Support) Training After learning how to reply to emails and write professional correspondence, this report-based training uses learningBOX and QuizGenerator to practice crafting email responses based on actual past customer inquiries. The CS training aims to “deepen understanding of the features and services of learningBOX and QuizGenerator,” and all employees—not just those in customer support—are required to take it. ▼For more details on CS training, please see our case studies on internal implementation: https://learningbox.online/casestudy/casestudy20200204/ Training Process Before beginning training on learningBOX, you’ll receive a brief verbal explanation of the training overview and how to proceed. A senior colleague will register you as a member on learningBOX; once you receive your “ID” and “password,” log in to learningBOX to begin the training. Training on learningBOX begins by studying the PDF files, Google Slides, videos, and other materials published on the platform, followed by taking a test to aim for a passing score. A passing score is set for each test; if you fail, you retake the test to aim for a passing grade. For quiz-style tests, learningBOX automatically grades them, but for assignments requiring a report, a senior employee grades the report on learningBOX after it is submitted. Impressions of New Employee Training on learningBOX Now, I’d like to share my impressions of the new employee training I received on learningBOX, which is the main topic of this post. Impression #1: No Confusion About Navigation When taking the training on learningBOX, I never had any trouble navigating the interface. You can use it without any issues even if you start without looking up the instructions. One key reason for this ease of use is that the “training you need to take is clearly visualized.” Point 1 ⇒ Materials are displayed in the recommended order. learningBOX includes a “course settings” feature that allows you to proceed to the next question only after passing a specific one. Since you cannot move on until you’ve passed a question and demonstrated understanding, you can progress through the training in the intended order. Point 2: Learning Progress Is Displayed as a Status Your current learning progress is displayed as a status and can be viewed in a list, allowing you to see at a glance which training modules have been completed and which are still pending. *For tests where you do not want to display the results immediately, you can change the display to “Completed.” Point 3: User-Friendly Question Interface Since learningBOX offers multiple question formats, tests can be created in the format that best suits the difficulty level and response method desired by the test creator. The question interface is simple and intuitive, making it easy to answer. It also includes an explanation feature, so even if you get a question wrong, you can easily review it. *With learningBOX, when you divide members into groups and configure course assignments, you can set up course distribution on a per-group basis. This allows you to display only the training courses that each department is required to take. Feedback #2: Deepen Your Understanding at Your Own Pace Since you can generally progress through the entire process—from learning to testing—on your own, you can study at your own pace. Additionally, learningBOX is equipped with “features designed to deepen learners’ understanding.” Point 4: Focus on Questions You Got Wrong Questions created in Master Mode are ideal for repeated study and review. By answering questions via the “Overcome Weaknesses” button, learners can focus their study on the questions they got wrong. Furthermore, if questions or sections were created using the “tagging feature,” the “Profile” page will display the number of correct and incorrect answers as well as the accuracy rate for each tag, allowing you to identify areas where you struggle. → Click here for more on the tagging feature Tagging Feature About the Tagging Feature By assigning tags to each section and question, you can utilize this data for performance analysis. (e.g., identifying areas of weakness) ▶ Click here for details → Click here to learn about the “Profile” feature About the “Profile” Feature The personal profile feature allows you to check how much each user studies daily and their progress. ▶ Click here for details Point 5: Save Learning Materials with the Favorites Feature You can mark learning materials as favorites, which is convenient for reviewing the training content in your actual work after the training is complete. Materials marked as favorites will appear under “Favorite Materials” in the “Study” section. Summary learningBOX is an e-learning platform that is easy for learners to use. It offers excellent usability, allowing learners to progress while verifying for themselves whether they understand the training content. Since it can be used on smartphones and tablets, it’s also possible to study at home as part of pre-employment training. If you’re considering implementing learningBOX, please be sure to register for an account. You can use nearly all features for free, with no time limit, for up to 10 accounts.
Member management - learning box

Let's use the privilege settings of learningBOX! School use version

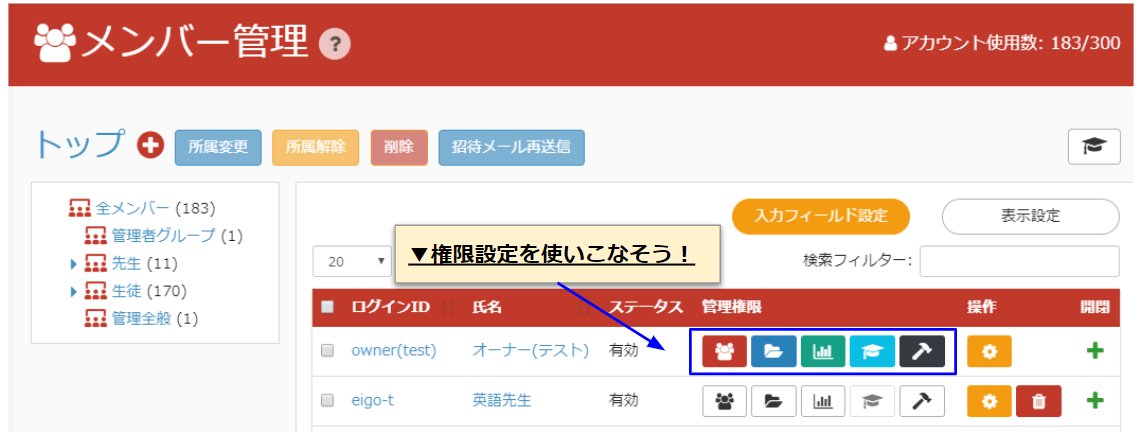
Mastering learningBOX Permission Settings! [School Use Edition] Hello! This is Shinokura ⛄ from the Quality Control Department. The COVID-19 pandemic is spreading worldwide, isn’t it? Let’s all stay safe by thoroughly following the basic precautions of “handwashing, gargling, and ventilation.” Now, in this article, we’ll dive deeper into “learningBOX Permission Settings,” which I briefly introduced last time!! Building on the previous post, I’d like to explain permission settings in greater detail and demonstrate how to configure them for use in schools. If you’re a customer considering implementing our e-learning system (learningBOX) at your school, please use this article as a reference to learn about permission settings and give it a try. Table of Contents: 1. A Quick Review of Permission Settings 2. Introducing Permission Settings Using a School as an Example 3. Assigning Administrative Permissions 4. Let’s Log In as a Member with Assigned Permissions 5. Summary A Quick Review of Permission Settings By using learningBOX’s permission settings, administrators can delegate “management, configuration, and editing tasks”—such as “creating learning materials, managing grades, and assigning learning materials”—which are typically handled by the administrator, to users designated by the administrator (those with assigned permissions). Users granted permissions can manage the learning environment within learningBOX just like administrators—for example, by creating content (learning materials), viewing and managing learners’ grade information, and assigning content to specific groups. *For more details on permission settings, please refer to our previous article, “How to Assign Appropriate Roles to Members Using learningBOX Permission Settings.” Here’s an example of permission settings for a school In this example, the administrator (principal) will grant permissions such as “creating learning materials, managing grades, and assigning learning materials” to the leaders (teachers) of each group. To make the permission settings easier to understand, we’ll categorize users as “Learning Administrators = Teachers” and “Learners = Students.” When configuring permissions, you must first create groups in Member Management. In this example, we’ll use these pre-prepared groups for the setup. Using learningBOX’s Member Management feature, you can drill down further into a single group to add and register members and sub-groups. ▼Group Structure: The groups in this example are organized in the following hierarchy: Teachers >> Student Management - Subjects >> Japanese - Math - English - Social Studies - Science... Students >> 1st Grade - 2nd Grade - 3rd Grade >> Class 1 - Class 2... *Regarding the permission setup process, we will create and assign member accounts to the “Teachers” group for teachers, to the “Students” group for students, and to the “General Administration” group for administrators. In this setup example, we will demonstrate the following: 1. The principal (administrator) grants administrative permissions to the “Vice Principal.” 2. Designating a “Student Administrator” teacher to manage “Students.” 3. Designating a “Teacher Administrator” teacher to manage “Teachers.” We’ll now set up these three items. Granting Administrative Permissions Log in to learningBOX using the administrator’s (principal’s) account to configure administrative permissions. As the overall supervisor of learningBOX, grant all administrative permissions. It might be a good idea to entrust this role to someone in a “vice principal”-like position whom the principal trusts the most! Here’s how to set it up. ▼Please watch this video. Here are the steps for setting permissions: ① Log in with the administrator’s account. ② Select the group or members for whom you want to set administrative permissions. In this case, select “General Administration.” ③ Click the “All Permissions” icon, select “All Members” and “All Learning Materials,” check all boxes, and save. With this setup, the “Vice Principal = Full Administrator” can now create groups and members (and grant permissions to them), create and assign learning materials, view grades, manage announcements, edit email templates, and perform configuration tasks. Setting Permissions for the Student Management Group ▼Please watch this video. Grant members (student administrators) belonging to “Teachers” >> “Student Management” the permission to manage “Students.” Click the icon button for management permissions, select “Students” (without selecting all members), and save. With this setting, student administrators can create, edit, and delete members within the “Students” hierarchy and below. Student member accounts do not require any specific permissions, so do not grant them permission to grant permissions. Set permissions for the Teacher Management group as well. ▼Please watch this video. Grant members belonging to “Teachers” >> “Teacher Management” (teacher administrators) the permission to manage “Teachers.” Administration Permissions >> People icon >> Instead of selecting “All Members,” select “Teachers” and save. Next, click the hammer icon under Administration Permissions, check the “Grant Permissions” box, and save. With this setting, teacher administrators will be able to create, edit, and delete members in the hierarchy under “Teachers,” as well as assign administrative permissions. Let’s log in as a member with these permissions. Log in to learningBOX as the member who was just granted permissions and check the Member Management screen. Full Administrator: Log in to learningBOX using the Vice Principal’s account. The screen is identical to that of the Owner (Principal). You can also configure input fields. Student Administrator: When you open the Member Management screen, a message stating “You do not have administrative permissions for this group” will appear—please don’t be alarmed. Click “Students” to view members belonging to the “Students” group. You can add, edit, or delete groups and members using the + button. (Under “Students”) Since you haven’t been granted permission to assign permissions, there are no items with the management permission icons. Teacher Administrator: Just as before, click “Teachers” to view the members belonging to the “Teachers” group. You can add, edit, or delete groups and members using the + button. (Under “Teachers”) Since you have been granted permissions, you can assign permissions from the management permissions menu. Summary Many schools across the country have decided to close suddenly as a measure to prevent the spread of COVID-19. While this was unavoidable, teachers likely found themselves struggling to cope with this sudden situation. In such situations, an e-learning system allows teachers to conduct classes by recording lesson videos and assigning problems from home, while students watch the videos and complete the assignments from home. You can experience our e-learning system, learningBOX, firsthand with a free trial. In this article, we introduced a method for assigning permissions to groups and members—such as those in a school setting—by granting only the specific permissions required, rather than uniform access rights. Next time, we’d like to discuss how to configure permissions for teachers by subject. Thank you for reading to the end.
learningBOX-PHP

How to unify text file encoding to utf-8 in PHP

I’m Nishimura, the creator and developer of QuizGenerator. To be honest, I wasn’t involved in the initial development of learningBOX; I joined the project in earnest around the time version 2.0 was released. Recently, I received a pull request regarding character encoding, which made me realize I needed to talk a bit more about character encoding, so I’ve put together this article. In this article, I’ll explain "how to standardize the character encoding of text files to UTF-8 in PHP." I hope you’ll enjoy reading it. Table of Contents: 1. Shift-JIS Is Inevitable 2. How to Avoid Garbled Characters 3. How Do We Determine the Character Encoding? 4. Summary Shift-JIS Is Inevitable Systems like learningBOX and QuizGenerator sometimes receive text files, such as CSV files. In modern web systems, text files should ideally use UTF-8, and we’d prefer not to accept any other character encodings. However, in reality, Shift_JIS files are occasionally uploaded, leading to bug reports. Therefore, in QuizGenerator, when a Shift_JIS file is received, it is converted to UTF-8 before processing continues. What Is Shift-JIS? It is a character encoding that includes various characters, including Japanese, standardized under the JIS standard. It is used as the standard Japanese character encoding on many computers. It is an improved version of the JIS code defined by the JIS standard; whereas JIS code represents characters using 7 bits, Shift_JIS code represents all characters using 2 bytes (16 bits).   mb_convert_encoding Cannot Be Trusted PHP has a function called mb_convert_encoding that can perform character encoding conversion. At first glance, it might seem that simply using this function would allow you to determine the character encoding and convert it to UTF-8, but in reality, this function cannot be trusted. If you use mb_convert_encoding("あああ ", "utf-8", ”utf-8, sjis-win”), if "あああ" is in UTF-8, it should remain as UTF-8, and if it’s in Shift_JIS, it should be converted to UTF-8 (at least according to the official documentation). However, in reality, it does something completely unexpected. It forcibly interprets a string passed as UTF-8 as Shift_JIS, corrupting it, and then converts that to UTF-8, resulting in a completely nonsensical value being returned.   How to Avoid Character Corruption ▼ "mb_convert_encoding works properly if you specify the source character encoding" mb_convert_encoding works correctly as long as you specify the source character encoding. In other words, the strategy of converting from Shift_JIS to UTF-8 only when the source is Shift_JIS, and doing nothing if it’s already UTF-8, generally works well. mb_convert_encoding("aaa", ”utf-8”, "sjis-win") The code above works correctly if “aaa” is in Shift_JIS. If it’s already in UTF-8, it’s fine as is.   How do you determine the character encoding? There’s a function called `mb_detect_encoding`, but if that works correctly in the first place, you can solve the problem simply by using `mb_convert_encoding`. If the standard functions don’t work, you’ll have to do it yourself. Determining whether a string meets the UTF-8 specification isn’t that difficult, so just do it.   What if it’s not UTF-8? If it’s not UTF-8… let’s just treat it as Shift_JIS. We can’t support people who upload files in EUC-JP or UTF-16. At the very least, anyone who does that should understand encoding, so please handle it yourself. After all, users are supposed to use UTF-8 in the first place. Another pitfall: I’ve used the term “Shift_JIS” several times in this article, but what’s currently referred to as “Shift_JIS” is often actually Windows-31J (MS932), which is an extension of Shift_JIS. However, if you specify Shift_JIS in PHP, characters other than those defined in the original Shift_JIS specification will appear garbled. Unless you have a specific reason, please specify Windows-31J or sjis-win instead of Shift_JIS. It’s a bit of a strange situation—the official documentation says to use Windows-31J, yet only `sjis-win` is listed—but at least in PHP 7.3.13, both specifications worked without any issues. Will a unified future ever come? About 20 years ago. When I first started web programming, UTF-8 wasn’t the standard, and garbled characters were a daily occurrence. As of 2020, most websites have adopted UTF-8, and garbled characters are rarely seen even when browsing international sites. It’s safe to say that the shift to UTF-8 is nearly complete in the web world. As for smartphones, since they were developed after UTF-8 became widespread, they are built with UTF-8 as a given. (Consequently, files in other encodings, such as Shift_JIS, tend to display garbled characters on them.) On the other hand, files exchanged on Windows are often in Shift_JIS.   Summary: In this article, we introduced “how to standardize the character encoding of text files to UTF-8 using PHP.” As a company based in Japan, we value ease of use for Japanese users, so we plan to continue developing while keeping Shift_JIS in mind for the time being. (Although I really wish I could forget about IE11...)

How to check the usage of learningBOX

Hello. This is Mukai from Implementation Support. In this article, I’ll show you how to check usage statistics for customers using learningBOX. With learningBOX, you can easily view the number of logins and the total number of courses taken by date, based on user history. Table of Contents: 1. Wondering if users are actually using the system? 2. How to Check User History 3. About Login Information 4. How to Extract Login Information Using Filters 5. Summary You’re probably wondering if users are actually using the platform, aren’t you? Let’s get right to it—after you start providing e-learning via your LMS, don’t you find yourself wondering about your learners’ usage patterns? Are the learning materials you took the time to prepare actually being used? Who are the most active users? Or, who are the users who haven’t been using the system much? You may also want to get a sense of overall usage patterns. In this article, we’ll introduce a feature that helps you answer these questions: the “Usage Status Report” feature in learningBOX.   How to Check User History: Log in with your administrator account, hover your mouse cursor over the [Management Functions] item in the left-hand menu bar, and click [ ]. ▼ Select “Usage Status Check.” ▼ You’ll be taken to the usage status screen. ▼ You can also check usage status by day or month.   About Login Information ▼ Number of Logins: You can view the number of logins by date. Click [Number of Logins] to view detailed login history. A list of access logs will be displayed. ▼ Number of Users: This figure represents the total number of accounts that answered questions. ▼ Total Number of Learning Sessions: This is the total number of learning sessions completed. You can check performance management under “Total Number of Learning Sessions.” How to Filter Login Information Using Search Criteria Go to Management Functions → Usage Status, then click [Date]. The screen will switch to the list of logged-in members. Enter the start and end dates, select the login and learning status, and click the search button. KEY POINT: By checking your learningBOX usage statistics, you can determine: ☑ “Who viewed which content?” ☑ “At what times did users log in?” ☑ “How much free storage space is left in learningBOX?” If you are a learningBOX user and have concerns or questions like these, we highly recommend checking your usage statistics. You can check daily login histories, including internal usage patterns and access times, as well as the specific times users logged in. Please make full use of this data when conducting data analysis, such as tracking learning progress, trends in course registrations and completions, and the correlation between the monthly average number of logins and the completion rate.   Summary: In this article, we’ve introduced how to check your learningBOX usage statistics. With learningBOX, you can view login activity and the total number of courses taken within a specified period. Thank you for reading this article.
learningBOX 2.9

learningBOX has been upgraded to version 2.9

About This Version Update Thank you very much for your continued use of the learningBOX e-learning authoring system. Today, learningBOX has been updated from Version 2.8 to 2.9. In this article, we will provide a detailed overview of Version 2.9.10 (released on February 13, 2020), which includes various new features.   List of New Features and Improvements ☑ “Integration with LDAP / Active Directory” ☑ “SAML Authentication Settings” ☑ “Badge Configuration Feature” ☑ “Resume-from-Pause Feature” ☑ “Designated Course Material Notification Feature” This update includes the long-awaited “Integration with LDAP / Active Directory” feature. In addition, numerous other features have been added, including improvements to existing functions. Now, let’s take a closer look at the details of this 2.9 series update.   Integration with LDAP / Active Directory With the learningBOX 2.9 series update, integration with LDAP servers is now supported. You can use directory services compatible with LDAP v3 (such as OpenLDAP and Active Directory) as a user authentication method. Using LDAP authentication allows you not only to authenticate users but also to manage them in conjunction with the directory service. *LDAP authentication integration requires a dedicated server subscription. SAML Authentication Settings: The SAML authentication settings, added in Version 2.8, have been enhanced for ease of use with the addition of supported IdPs (Identity Providers) and an authentication configuration screen. SAML (Security Assertion Markup Language) is an XML-based international standard authentication method for user authentication across different domains on the Internet, and it is a protocol for implementing single sign-on (SSO). Single Sign-On (hereinafter referred to as SSO) is a mechanism that allows users to log in to multiple services simultaneously using a single ID and password. *SAML authentication integration requires either design customization or a dedicated server subscription.   SAML Authentication Settings in Trust Login “Trust Login” is an enterprise-level single sign-on service that includes “Single Sign-On”—which enables users to log in to multiple services with a single ID and password—as well as core features such as “ID Management” and “Log and Reporting Functions.”   SAML Authentication Setup for Google G Suite: You can register learningBOX as a G Suite SAML app. SAML Authentication Setup for OneLogin: You can register learningBOX as a OneLogin SAML app. Badge Feature: A feature incorporating gamification elements has been added. With the badge feature, learners are awarded badges based on their learning achievements, which is expected to boost motivation. Additionally, learners can check their course progress at a glance. The badge display feature can be configured on a per-course or per-folder basis. *Please note that the conditions for earning badges vary by course.   Pause and Resume Feature The “Pause and Resume” feature, which is useful when administering tests and exams, has been further improved. While it is common to limit each test to a single attempt, this update allows learners to pause and resume a quiz even if they are forced to leave the system screen during the exam. This option allows you to configure pause and resume settings when taking quizzes or tests. You can pause your responses midway and resume from where you left off. A new “Resume from Pause” mode has been added in this update. ・If you select “Enabled,” you can choose between “Resume from where you left off” or “Start over from the beginning” when resuming. • If you select “Resume from where you left off only,” you can only choose “Resume from where you left off.” Designated Course Completion Notification Feature We’ve added the “Designated Course Completion Notification Feature” to address requests such as, “I want the administrator to be automatically notified when a learner completes a specific course.” This feature allows you to configure “email notifications to administrators” whenever there is a change in a learner’s performance status. By using this email notification feature, you can set it up to send email notifications to administrators only for specified learning materials. You can configure the system to send email notifications to administrators only for specified learning materials.   Other Information: For detailed instructions or if you have any questions, please contact our CS Sales Team. ● Contact Form We will continue to listen to our customers’ feedback and work on improving our features to make your experience even more enjoyable. We appreciate your continued support of learningBOX and QuizGenerator.
LearningBOX report function

How to set up a report assignment using learningBOX

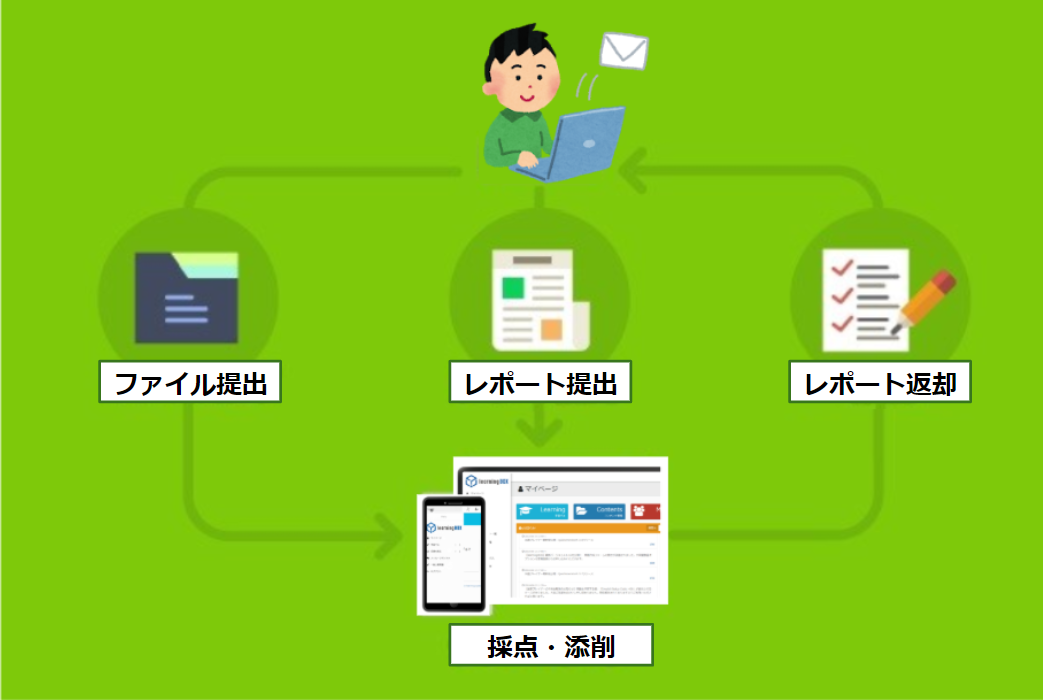
How to Set Up Report Assignments Using learningBOX I’m Kitaoka 🍎 from the Marketing Department. In this article, I’ll show you how to set up report assignments using learningBOX, our e-learning system. In addition to its quiz creation feature and “Fill-in-the-Blank Notes and Flashcards” designed specifically for memorization, learningBOX also offers a content feature that allows you to assign report tasks to learners. This feature is extremely effective for assessing learners’ understanding of the material and gathering feedback on in-house training!! It’s easy to set up, so please give it a try. Table of Contents 1. What Is the Report Submission Feature in learningBOX? 2. Creating a Report Assignment 3. Grading Submitted Reports 4. Learners Can View Their Grades 5. Summary: What Is the learningBOX Report Submission Feature? The “Report Submission Feature” allows you to have learners submit report assignments. Reports can be submitted in two formats: as a file or via an input form. *Please note that this feature does not include an automatic grading function. Creating a Report Assignment. ▼STEP 1. Log in to learningBOX Log in to learningBOX and click [Content Management] on the menu bar. ▼STEP 2. Click the ⊕ icon You will be taken to the Content Management screen. Click the action menu (+ icon) in the upper-left corner and select [Report Assignment]. ▼STEP 3. Select the report assignment submission method. You can choose either “Web Input” or “File Upload,” or both. Next, enter the report assignment title and any notes. *If there are no specific notes to include, you do not need to enter anything here. Finally, click the Save button to complete the process. Submission Methods: Web Input, File Upload *... You can allow submissions in both formats. *The supported file extensions can be customized if you are using a dedicated server plan. Please contact us if you have any requests. Once the report is submitted, you will grade it. We’ll proceed under the assumption that the administrator has set up the report assignment and the learner has submitted the report. Go to [View Grades] → Report Grading Management on the menu bar. The submission date, report title, student name, pass/fail status, score, submitted file, and grade will be displayed. ▼ How to Grade Reports • Click “Download Submitted File” → You can download the file submitted by the learner. • Click the “Grade” button → You can grade the submitted report. *Enter a score and select “Pass” or “Fail.” Optionally, enter feedback, then click “Save” to complete the process. Learners can view their grading results. Learners can check the pass/fail status of their report assignments from the “Grades” section of their account. ▼ Click the “Details” button to view the content in more detail. Summary In this article, we introduced the report feature in learningBOX. Reports can be submitted in two formats: as a file or via an input form. Setup is simple, so please give this report feature a try. Thank you for reading this article.
Upgrading the learningBOX

About updates and upgrades of the learningBOX

Hello, this is Kadota from the Development Department. It feels like we just entered 2020, and before we knew it, it’s already February. We’re right in the middle of winter! Let’s eat some warm food, stay strong against the cold, and keep up the good work! The topic of this blog post is “Updates and Version Upgrades.” Thank you for reading. Table of Contents: 1. What Is an Update, Anyway? 2. What Is a Version Upgrade? 3. The Difference Between Major and Minor Updates 4. When Is the Next Update for learningBOX? 5. Summary What Is an Update, Anyway? When using a computer or smartphone, have you ever seen a message suddenly pop up saying “Update ready” or “Please update” and wondered, “What’s that about?” If you use a lot of apps on your smartphone, you might see something being updated every day. Generally speaking, an “update” refers to minor improvements or bug fixes for a service (app or software). *For example, this might involve fixing bugs, implementing new virus protection, or adding minor new features. What Is a Version Upgrade? In contrast, a version upgrade refers to a major improvement or update, which may include the addition of new features, changes to the design, or alterations to how the software is used. Let’s consider Windows 7 as an example. For instance, support for Windows 7 recently ended. Over the past year or so, we’ve frequently heard recommendations to switch to Windows 10 because support for Windows 7 was ending. If you switched from Windows 7 to Windows 10, that counts as a version upgrade. Even though they’re both Windows operating systems, Windows 7 and Windows 10 are quite different. For example, “the Start menu has changed,” “it boots up faster,” “security has been enhanced,” and “Microsoft Edge” has been included. It feels like a completely new, separate product. You can think of a version upgrade as an improvement or update of this magnitude. Incidentally, the term “version upgrade” appears to be a Japanese-coined English term and is not understood by English speakers. The equivalent term in English is “version upgrade” (or simply “upgrade” is also acceptable). Some people may be more familiar with the term “upgrade” than “version upgrade.” The Difference Between Major and Minor Updates Updates are sometimes referred to as “major updates” or “minor updates,” while version upgrades are called “major version upgrades” or “minor version upgrades.” Which term is used varies depending on the company releasing the service, and the subtle nuances differ as well. Basically, you can think of it this way: if it’s labeled “major,” it’s a significant change, and if it’s labeled “minor,” it’s a minor change. KEY POINTS: Major → Significant changes Minor → Minor changes When is the next update for learningBOX? At our company, we refer to updates that include new features as “major updates,” and updates that primarily address bug fixes as “minor updates.” As of the time of writing this blog post, the latest version is “2.8.18.” We manage minor update versions using the rightmost digit, “18,” in “2.8.18.” We release updates roughly once a week. Therefore, the next version, “2.8.19,” is scheduled for release soon. As for “major updates,” we use the middle digit of “2.8.18”—“8”—to track them. We release major updates every three to four months. Development on the upcoming “2.9” series is well underway, and we expect to release it very soon. Announcement: Since we’re on the topic, let me briefly introduce some of the features coming in the “2.9” series. LDAP authentication integration—which has been highly requested by customers using internal directory services (such as OpenLDAP or Active Directory)—will now be available. By integrating learningBOX with an LDAP server, you’ll be able to synchronize account information and perform login authentication. LDAP authentication integration requires a Dedicated Server plan. → Pricing Plans. Please check here for details on LDAP authentication integration. Summary: Do you now understand the meaning of the terms “update” and “version upgrade,” which you may have been using without fully realizing their significance? The next time learningBOX is updated or upgraded, please take a moment to see what has changed. It might be hard to notice the changes with a simple “update.” In that case, please check the release notes. Also, while learningBOX is currently in the version 2 series, the day will surely come when version 3 is released. If you have any requests for specific features you’d like to see, please feel free to contact us.
About China's EdTech market

About China's EdTech market

About China’s EdTech Market It’s been a mild winter this year, hasn’t it? How is everyone doing? Without further ado, I’ve done some research on China’s EdTech market. Here’s the table of contents: 1. China’s EdTech Market Is Booming. 2. List of Unicorn Companies in China’s EdTech Sector 3. Why Is the EdTech Market Growing So Rapidly in China? 4. The Future of the EdTech Market China’s EdTech Market Is Booming. What Is EdTech? Currently, China’s EdTech market appears to be gaining significant momentum. EdTech is a portmanteau of “Education” and “Technology,” referring to initiatives that incorporate technology into the education sector to drive innovation. The integration of technology into existing industries to create new value is called X-Tech (Cross-Tech), and EdTech is one such category. *X-Tech encompasses various fields, including FinTech (finance), MedTech (healthcare), AdTech (advertising), HRTech (human resources), AgriTech (agriculture), and LegalTech (law). Many unicorn companies originate in China! To illustrate just how dynamic the Chinese EdTech market is, 8 of the 14 unicorn companies in the global EdTech sector are Chinese (approximately 57%). The remaining companies include 5 from the United States and 1 from India. *Source: Holon IQ article dated January 6, 2020. A “unicorn” refers to a privately held startup founded within the last 10 years with a valuation of at least $1 billion (approximately 125 billion yen). In other words, the fact that 8 out of 14 companies are Chinese can be seen as an indicator of this sector’s growth.   List of Unicorn Companies in China’s EdTech Sector Here is a list of unicorn companies in China’s EdTech sector (as of January 2020). VIPKid: Online English conversation lessons with North American instructors; Yuanfudao: Online tutoring and math and English services for children; Knowbox: Online education utilizing AI teachers; iTutorGroup: Online English conversation classes with North American instructors; Zhangmen: One-on-one instruction; Huike: Industry-academia collaboration; 17zuoye: Online education platform for K-12 * K-12 refers to education from kindergarten through 12th grade (third year of high school); K = kindergarten. HuJiang: Online classes, social media, and community focused on language learning. Why is the EdTech market growing so rapidly in China? Looking at the number of unicorn companies worldwide—not limited to the EdTech sector—a CB Insights report (as of January 6, 2020) shows there are 433 such companies: 214 in the U.S., 101 in China, 22 in the U.K., and 19 in India. Japan has 3. While China accounts for approximately 23% of the world’s unicorn companies across all sectors, its share in the EdTech sector is about 57%, clearly demonstrating that China’s EdTech sector is growing significantly faster than other sectors. Why is the EdTech market growing so rapidly in China? The following factors can be cited as reasons. A Cultural Background That Values Education: Due to intense educational competition, education is highly valued as a means to succeed in this competitive environment. Families with preschool-aged children reportedly spend an average of 26% of their household income on education, while those with K-12 children spend 20% of their income on education. *Reference PDF: The Value of Education—Higher and Higher – HSBC Group A Huge Market Approximately 20% of the world’s population lives in China, and according to an announcement by the Chinese government (January 17, 2020), the population exceeded 1.4 billion as of the end of 2019. Furthermore, the one-child policy, which lasted for about 35 years, has been relaxed since 2016, creating additional opportunities for customer growth. (Currently, the birth rate is at an all-time low and has been declining for three consecutive years, leading to a declining birth rate and an aging population. However, the overall population is still growing.) Another factor is the growth of the middle class, which has the financial means to invest in education. Widespread Recognition of EdTech: There appears to be a strong consensus within China—including among venture capital (VC) firms—that EdTech represents a large market. Strong Government Support: Since 2011, the Chinese government has increased the percentage of GDP allocated to education almost every year. It has also provided extensive support, such as constructing the 22-story MOOC Times Building—dedicated to EdTech—in Beijing’s Zhongguancun district. In 2017, Premier Li Keqiang outlined a plan for China’s education reform incorporating technology, with a target date of 2030. A Fertile Ground for Developing Talent This growth is also influenced by the impact of “maker education,” which aims to increase the number of creators, as well as the presence of young people known as “sea turtles” who acquire cutting-edge knowledge and technology overseas and return to China to make their mark. These are just some of the various factors that can be considered.   The Future of the EdTech Market What did you think? In this article, we discussed China’s EdTech market, and I hope you gained an understanding of how rapidly it is expanding. It seems likely that the Chinese EdTech market will continue to develop at a rapid pace. I believe that a system combining cultural background with government support is the driving force behind the creation of new educational services. Not limited to China, the number of countries focusing on e-learning and EdTech is likely to increase even further in the future. Our company will continue to work hard so that Japan can become a leader in EdTech. We look forward to your continued support of learningBOX!   *Reference Sites: ・Why Is China The World's Leader In Edtech? ・NHK News: Ohayou Nippon – “Sea Turtles” Supporting China’s Rapid Technological Development”
eLearning-scorm

Rewrite your own program to SCORM material and use it in the learning box.

Let's rewrite your own program into SCORM materials and use them in learningBOX! Hello. I am Morishita of the Development Department. In this paper, I would like to introduce how I implemented a program for "Hundreds of Maths" as a SCORM teaching material on learningBOX. I was able to implement the program even though I have only been learning JavaScript for a short time, so if you read this paper, you will be able to reproduce it immediately if you have written simple programs before. Let's publish your one-of-a-kind program on learningBOX! The description to support SCORM has been introduced in the previous article "Let's make SCORM teaching materials", but this time, I would like to implement something a little more teaching material-like (?). This time, I would like to implement something a little more like a teaching material. How to upload your own program 2. Download this program '[download id='30640' template='HundredCellsCalc.zip']' and check its actual operation on learningBOX. This program is based on the code here, with grading and timer functions added. Vue is used to generate the tables. Here are the files to be prepared for creating and implementing SCORM materials. Please prepare the following three files: ・'index.html' ・'index.js' ・'style.css'. When uploading, save the necessary files as a single zip file. The html file must be named 'index.html'. If you use a different name, an error screen will appear and you will not be able to study. You can upload the file [HundredCellsCalc.zip] as it is. Check the operation of the SCORM teaching materials After learning the Hundred Cells Calculator, click the 'Submit' button to send the results. The learning status of the teaching material will change to 'Pass' or 'Fail'. When you look at the grades, you can see that in addition to the learning status, the score and time remain. The administrator will be able to check the user's course history on the grade management page and download the grade data in CSV format. For more information on grade management, please refer to the grade management page here. The data to be sent to the LMS at the end of the course are 'score', "time", and "learning status (pass or fail)". If you are interested, please refer to the Japanese version of the SCORM specification from the Japan E-Learning Consortium. Let's take a look at the features of the SCORM code. The following three processes were added to the program when converting the 100-masu calculation to SCORM. ☑Add a function init to search and initialize the API. (index.js) ☑Add an onload event to execute the function init when the page is loaded. (index.html) ☑Add function sendResult to send data to the LMS after the study is completed. (index.js) This time, the data to be sent to the LMS at the end of the study are "score", "time", and "study status (pass or fail)". Each of these corresponds to 'cmi.core.score.raw' 'cmi.core.session_time' 'cmi.core.lesson_status', but there are a few things to note when sending the data. When setting a value in 'cmi.core.score.raw', it must be a string type (numbers cannot be sent) 'cmi.core.session_time' must initially be '00:00:00'. passed', 'completed', 'failed', 'incomplete', 'browsed', and 'not attempted'. In this program, the data will be saved in the LMS when the final sendResult() is executed. ▼ Below is the process we have added to make it compatible with SCORM materials. (i) (index.js) function init to search and initialize the API Here, 'browsed' is set as the initial value of the learning status, but it will be 'passed' or 'failed' after learning is completed. (ii) (index.html) onload event that executes init() when the page is loaded (iii) (index.js) sendResult function that sends data to LMS after learning is completed Score (numerical value) is set to vue.score, learning status to vue.lesson_status, and time to timer_status. status, and timer.textContent for time. vue.score is set to a string before being set. LMSCommit finalizes the retention of the value (LMSFinish, which terminates communication with the LMS, includes the same behavior). Conclusion Although the SCORM specification may seem complicated and difficult to understand, learningBOX is a SCORM 1.2-compliant LMS, and by writing code to send learning data to the LMS, users can use it as a learning material. If you are already using learningBOX for in-house training or at school sites, or if you want your users to use your own programming materials, please give it a try. It will also be useful when you want your users to see what you have created in your programming studies. Although there are several content features of learningBOX, there are still many teaching materials that are difficult to realize with existing content. (Regarding learning contents) For example, it would be very attractive if there were learning materials with puzzle games, board games, or RPG elements, such as ones in which the question text itself changes randomly each time a question is presented, or ones in which the user directly manipulates the screen. If you can create such learning materials by yourself or find the source code, you can register them as SCORM learning materials in learningBOX. We call them "teaching materials" for convenience, but of course, even if they are "games", they are essentially the same. If you know simple JavaScript code, you only need to rewrite it a little to be compatible with SCORM, and you can use it with learningBOX (free of charge, of course). Thank you for reading this paper as well.
Find more about learningBOX